Tuesday, April 30, 2013

A Few Thoughts...


Spring is finally here to stay (yay!) so I thought I would give the blog a little make over. I have been wanting to change the layout for awhile but just was not sure what to do. I think I like it. I do like my new header picture. It is really making me want to sew something in linen soon.

The sewing nook enjoyed some spring cleaning a couple weeks ago...but it needs it again. It is so hard to keep it neat and tidy when I am in the middle of sewing a bunch of things. I am working on trying to keep more organized while I sew. My fabric stash managed to stay nice and neat so I am happy about that! It took me two days to get my stash under control. I had a lot of ironing to do but it was well worth it!


KCW wrapped up on Sunday and I didn't finish all that I wanted. Oh well....Sunday was a beautiful day and the kids wanted to play outside and I could not resist joining them! We ran around the backyard and played hide and go seek - which by the way is hilarious with a three year old! I had to pretend a lot that I didn't see him ;) We stayed outside until it was time for dinner and then it was bath time and then story time and then bedtime for all of us - so no sewing got done. I am really glad that I spent the day playing with my kiddies instead of sewing. They grow up so fast and sometimes I need to remember to just slow down, stop what I am doing and enjoy them while they are little. I know all too soon they will just want to hang with their friends and I don't want to look back and wish I had spent time running in the yard with them. I want to look back and remember that I did.


Love these faces!

Thanks for stopping by!
Meghan

Saturday, April 27, 2013

Kid's Clothes Week - Day 5 and 6

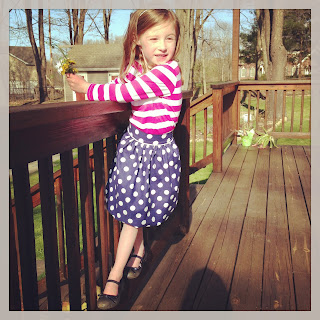
So, I was overly ambitious in thinking I would finish the flashback skinny tee AND the bubble skirt for day 5. The bubble skirt spilled over into day 6. Which is fine....if I attempted to finish it last night I might have thrown it in the garbage and then cried a lot. I made some changes to the tutorial I followed that caused me a bit of grief but worked out in the end, which is great because I really love the bubble skirt. I am so happy with how it turned out - I just need to move the button over so it closes all the way. You'll see what I mean in a picture below and I'll explain why the skirt almost wasn't completed.

I'll start with the Flashback skinny tee - I cut the size five and used some pink and white stripe knit that I got from Fabric.com. It is very thin so I decided to line the upper part of the tee with some white knit and follow the neckline finishing directions that came with the Beachy Boatneck pattern. I really like how this came out! I am still not so great at using ribbing to finish the neckline of tees so this was a great solution and it helped to achieve the look I was going for. I also shortened the sleeve length to a three quarter sleeve and just folded the sleeve under a half inch and stitched it with a zig zag. So with my slight modifications, I got the look of a boatneck with the fit of the skinny tee. I probably could have cut the size four for my skinny mini since the five is a little big (not so skinny fit) but now it will last her through the summer and probably the fall and even into next spring - this kid does not grow very fast at all!


lining inside tee
 
The bubble skirt - ah the bubble skirt! I have wanted to make Erin a bubble skirt ever since I saw Simple Simon & Co.'s tutorial for their beautiful yellow bubble skirt. I love how cute it looks and I knew Erin would love it too. Why it has taken me so long to make one, I don't know. I thought that KCW would be the perfect excuse to finally make one. I followed the tutorial for the most part but wanted to try to make the skirt with no exposed seams and piping in between the waistband and skirt. This was the part that made me want to scrap the whole thing. It took me a few tries (and some cursing) to get it right. If it didn't frustrate me so much, I might have been able to share with you how I did it. I am sure that you could figure it out for yourselves and probably do it much better than I did anyway! The waistband is what gave me the most trouble, I re-did it four times! After the third date with the seam ripper last night is when I decided to call it quits and come back to it today. It still did not come out perfect - I had to do some hand stitching on the inside of the waistband which I really do not like because I am really not that good at it lol! It should have been very simple. In the end, I just basted the piping to the skirt then sandwiched the skirt in between the waistband. For some reason I was coming up with all these other complicated ways of putting in the waist band and piping. Hence the three dates with Mr. Seam Ripper *sigh*


inside of skirt
 
no exposed seam  - i'll spare you the hand stitching!
 After I finished the skirt today, we went outside for some pics. Erin was happy with the end product which made me REALLY happy since it took me so long to do!

Nice cheesy look!

oh how i love the piping!

more cheesy smiles ;)


i really could not imagine this skirt without the piping!
you can see here how the back of the skirt does not meet - just need to move the button over a bit!

flowers for you mommy for making me this outfit - aww she's so cute! 
Thanks for stopping by!

Thursday, April 25, 2013

Kid's Clothes Week day 1-4

Oh how I wish I had more than one garment to show you all since it is day four of KCW but alas, I do not. I started day one with fabric selection (even posted a pic of it on Facebook), then I printed out all the patterns that I want to use and pieced them together. Day two, I cut out all the pattern pieces that I needed for the clothes that I want to sew. First two days pretty productive.

Day three...well day three I didn't do anything. I didn't feel all that great and since my husband was off from work, I took a nap - right in the middle of the day! I have not done that since, well I can't remember! I'm not going to lie, it felt great and I felt much better after I woke up :)

So today I just had to get some sewing done. I made Erin a Beachy Boatneck by Blank Slate Patterns that I purchased from Go To Patterns. I love how it came out! The pattern was very easy to sew. The instructions were really great and I finished the shirt in about an hour and a half - not too bad for me since this was the first time I used this pattern. The fabric for the shirt came from Fabric.com and it is Laguna stretch cotton Jersey Knit in Amethyst. I originally bought the fabric to make a dress for myself but decided Erin was more in need of spring shirts than I was in need of a dress. (I did have plenty of fabric though that I was able to make myself a tunic as well. That is a post for another day though;)) Erin was very excited to see the shirt when she came home and hammed it up for the camera. I love how the shirt looks with the capri leggings she had on!


Seriously could not get the kid to stay still for a single picture! Oh well, at least she likes her new shirt!

Tomorrow I am determined to finish a Flashback skinny tee and a bubble skirt - very ambitious!

Linking up to The Train to Crazy and The Girl Inspired

Thanks for stopping by!

Friday, April 12, 2013

It's All in the Details - Butterfly Geranium Dress

This week is week three of All Stars over at Project Run and Play and the theme is "It's All in the Details". I had not planned on participating in any of the sew along challenges this time. I was just going to enjoy all the awesome looks the All Stars came up with and that showed up in the linky party of the sew along group. But I had this dress in mind for awhile now and thought it would be fun to submit as part of the linky party. The only problem is I didn't decide that I wanted to participate until Wednesday so I am writing this post just about an hour before the linky party closes and only just finished the dress about 15 minutes ago! So, sadly I have no modelled shots because Erin is in school. All I had left to do last night were the buttons and button holes but I was too tired to finish and Erin did not want to try the dress on until it was totally complete - ugh models lol!


So big shock here - the pattern is the Geranium dress with a sleeveless bodice and the view B pleated skirt with pockets. I added butterfly wings to the front of the bodice using Ann Kelle Remix in Bright and some rainbow colored buttons from my stash. The bodice is just plain white Kona cotton from Joann Fabric and the skirt is Ann Kelle Remix in Royal. I love the daisy pattern on the skirt fabric and the stripes in the butterfly wings - it really screams spring to me which we had a taste of this week! Yay!

I cut the wings so that it gave a kind of chevron effect with the stripes which I thought was cool. I had originally cut the wings out so the stripes were running horizontally but I didn't like it as much and it did not allow for a lot of the different colors to come through. I was going for more of a rainbow effect so cutting the stripes on the diagonal and in two different spots let more of the different colors show. I added different colored buttons for the body of the butterfly and coordinated the thread for each button.


For the button closure on the back, I used three different color buttons and sewed coordinating button holes for each. That part was a bit of a pain, changing out the thread three different times and having to rip one of the button holes out because it came out crooked the first time - sigh I never want to rip a button hole out again! That really was NOT fun!!


I also did some edge stitching along the neckline and arm holes but you cannot really see it that well since I used white thread. I do like the extra detail of edge stitching though and that is what the challenge was about, detail! I also added my label and did two rows of stitching around the hem.


I really like how this dress came out. Erin was very excited when she saw the butterfly on front. I can't wait until she gets home so she can try it on and I can get some cute pics of her wearing it!

*Here are some pics of Erin in her dress - she just loved it!!

"Mommy, get a picture of me smelling the flowers. Butterflies like flowers"


Flying around like a butterfly!


Thanks for stopping by!

Tuesday, April 2, 2013

Pretty Penny Lane Pillowcases

This past fall, the husband and I finally bought a new bed. We had been sleeping on a double bed for the last 7 and a half years and it worked for us - until we had kids that decided they wanted to join us in the middle of the night! Now it wouldn't be so bad if they didn't perform acrobatics and alligator death rolls in their sleep but they do so we needed a change. We decided to go all out and upgrade to a king. So much room! It
is almost like having my very own bed to myself! And I hardly notice the late night acrobatics of the little imps that steal into our bed at night ;)

Since we upgraded the bed, we needed to upgrade the sheets and comforter as well.  I found a set that I liked at Macy's and the best part was it was on sale! Yay! And free shipping. Double Yay! The only problem with the set was that the reason it was on sale was because it was a discontinued line so I couldn't order any of the other pillows that came with it and of course they were already sold out. Boo....but wait don't I own a sewing machine? Duh! I could just make pillow cases to go with the new set (smacks self on forehead)

So, that is what I did. I found some fabric in my stash that matched the color of the comforter set and sewed up some pillow cases for two standard size pillows. One of the best parts about this project was it was free! I had two plain white king pillow cases and two standard size pillows already and the accent fabric from my stash. I cut up the king pillow cases so that I could re-make them into standard size with the fabric accent around the side. The other great thing about this project was it was quick and I have some more scraps of the fabric left over along with coordinating fabric that I am going to use to make a pillow cover for a lumbar pillow that I have.

The fabric is from a discontinued Riley Blake line called Penny Lane. I have three fabrics from this line and am so happy that they coordinate with the new comforter set. I can't wait to get started on the pillow cover. I am thinking of piecing the fabric together so it mimics the lines in the comforter. We shall see how that goes. I have so many other things that I want to sew the pillow cover will have to wait awhile.


Love my new pillow cases!
 
Thanks for stopping by!


Monday, April 1, 2013

Follow me with Bloglovin'

href
="http://www.bloglovin.com/blog/6528985/?claim=9dxpsmmge4h">Follow my blog with Bloglovin
Hello readers!

As of July 1st, Google Reader will be no more so I hopped on over to Bloglovin' to keep up to date with all the blogs I follow. I linked my blog up as well, seems to be what all the cool bloggers are doing ;) The great thing about Bloglovin' is it transfers all the blogs that you are following over to their site so you don't have to! This is very handy especially if you follow quite a few blogs like I do.

Click the icon on the left side of my blog to sign up with Bloglovin' and follow all your favorite blogs!

Thanks for stopping by!